Thursday, May 29, 2014

#TBT: How I learned to sew

This week, I had an idea suddenly for throwback Thursday! I want to tell the story of how I got into sewing. I'm also using this story to mark the event of me getting a sewing machine from my favorite person, Brynn :), as a gift for my graduation from college. Yes, I'm a graduate now. Almost a two week old graduate (oh, how time flies). 

During my high school career, I was already a crafty youngin'. I was really into knitting my own stuff. I even joined the knitting club at my high school for a short period. Of course, I got kind of bored with every project unless I could finish it in maybe two days tops.
I started to go to thrift stores as a senior in high school, mostly towards the end of my last semester. I also became more fashion conscious and went on Lookbook.nu and Modcloth daily to look at the trends.


Here's me as a senior in high school, wearing one of my first thrifted purchases, a dark velvet vest. I was so young!

College is the place where you an reinvent yourself, so I tried to express myself more through fashion when I entered college.
I got really into crafting with t-shirts. I would draw designs on my them, like "Moo-stache" with a cow drawing, and "Konnichiwa" in hiragana when I started learning Japanese.
I bought this book "108 Ways to Transform a T-shirt" from Generation T, which I used to kick start my learning to sew. In the intro to the book, they include many hand stitches: names and descriptions of what the stitch does and what you should use it for. I used this book to start sewing t-shirts into things. I would buy the color and amount of t-shirts I needed from AC Moore or Michael's, I would cut the shirts up just like you would any fabric, and I would sew the pieces together. It may sounds strange but that's how I did things. It helped to have the base of a t-shirt already so I could just add on to it whatever I wanted.

This happened throughout my freshman year at college and slightly longer. My first actual sewing project was a dress I made out of t-shirts for Semi-formal 2010 at my college.


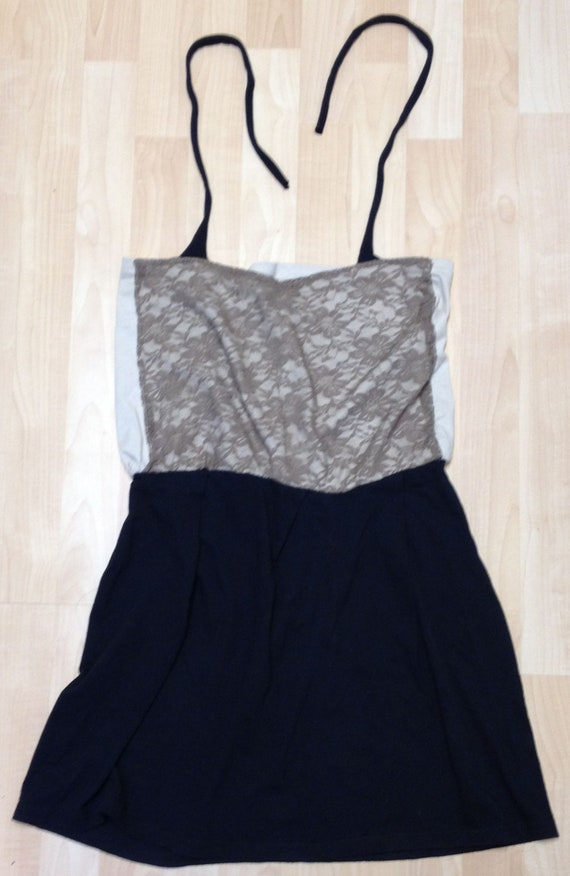
I think it was good for my first sewing endeavor. It's interesting looking back at it and seeing how much I've gotten better at sewing. I sewed the seam that connects the top to the skirt with a back stitch because I was like "I want a strong seam here," but that was a mistake. The first time I tried it on after I sewed that seam, I realized I could not put it on because that stitch does not stretch at all. Needlesstosay, after all that, I was still proud of it. I handsewed it out of t-shirts in a weeks time! So I was happy.

After this, I started to sew more things, mostly cosplays. I'm still pretty proud of my Mion Sonozaki cosplay I sewed out of all t-shirts, except the tie. That tie was like the first thing I sewed not out of t-shirts. I followed a pattern for the first time with the tie as well


I sewed this in the summer after my freshmen year in college, so I had more experience by then but not much.

Since then, I've sewn some more cosplays, bows, skirts, etc. This year, I got into making circle skirts. Even with all the experience I've gained in handsewing, my first circle skirt didn't turn out the greatest. Sewing is a learning experience! I know that well.

So, I don't know how many people read my stuff, but I'm going to ask you guys anyway.
If you sew too, how'd you get into it? And are any of you interested in cosplay? Because I can totally post more on my cosplays.

Thanks for reading, or just looking :)

FOLLOW ME: INSTAGRAM | LOOKBOOK | BLOGLOVIN

Wednesday, May 28, 2014

Cool Kid


Fleece Baseball cap: thrifted | DIY crop top: thrifted | DIY high waisted shorts: thrifted | scrunchie: handmade


Wore this simple outfit Tuesday to go thrifting in. Very appropriate I think because most of these items were thrifted! And, actually, the hat in this look is one of the purchases from my thrift trip hehe :) I'll post my most recent thrift haul soon!

The shirt was originally a large men's shirt, which I just cut in half to make me a nice crop top. The trouble with a shirt like this is that, if you lift your arms, the shirt will lift up with them, possibly exposing yourself. 
This is a very simple DIY which I'm sure doesn't need it's own post. I just suggest cut a bit lower than you measure just in case. I always do that to prevent a tragic clothing mistake that will never be reparable! 
Remember: you can always cut more off, but you can't add more on (easily, anyway).

I've cut a couple of these shorts recently. Basically, when trying on high waisted mom pants at the thrift store, only keep in mind how it fits around your waist and butt. You don't have to care about the legs since you're going to be cutting them off.

The scrunchie here was the first thing I sewed with my new sewing machine. It's super easy, and I might post a DIY about it. 

What do you guys think?

Thanks for reading, or just looking :)

FOLLOW ME: INSTAGRAM | LOOKBOOK | BLOGLOVIN

Tuesday, May 27, 2014

Updates and stuff

Hey, peeps!
It has been a while since I posted on here. I've been kind of busy with life and stuff.
I graduated college a little over a week ago, so I've been trying to find a job and figure out what I'm going to do with my life and stuff. Don't ask me about it hehe.


Here's me in my graduation outfit. 
I wore the dress from my previous thrift haul post. I paired it with my black booties I got from the Jumble Store in Kyoto, Japan and some black tights, since it was kind of cool that day.

Lately, I've been trying to set up a storenvy because I want to get rid of some clothes and I want to share my great refashions with the world! Hehe
I'll make a post about it when it's ready and stuff sometime soon.
I have been doing some crafts lately, so I might post about that, and I'm planning on going thrifting at my local Salvation Army.
Last week, I went to a couple second-hand stores in Burlington, VT but they were out of my price range, or willingness-to-spend range, which is very little since I'm a cheapskate.
I have been working on a crop top for my sister so I could post about that as well.
It's a little challenging since I'm not in a routine anymore, but I'm going to try to post consistently on this blog. We'll see how it goes!

And what do you guys like so far post-wise?

FOLLOW ME: INSTAGRAM | LOOKBOOK | BLOGLOVIN

P.S. Today, I saw a post on Nylon's FB page with Mariah Carey, which made me think of this song, so I've been playing it over and over again while writing this post.
~~** Listen to it for some 90s nostalgia **~~

Saturday, May 10, 2014

DIY Button up crop top

Hey, everyone! Got another diy! Really easy, too! Just need some sewing knowledge.

Got the idea from karma clothing. Pic from my previous inspiration post


I can't believe I never thought about this before! Well, now I have, and you can too!


First, I thrifted a mens button up with a cool print that I didnt mind cutting up


I really like this print, reminiscent of a hawaiian shirt but with different fabric. This is the kind of print I'd imagine being sold along with those shirts above.

Next, I tried the thing on. I figured out where I wanted to cut it, and just in case, cut it one button lower than that. I learned the hard way before that you can't go back after cutting too much off.

After marking which button I wanted to cut at, I cut the shirt starting from there. To make an even cut, either try ur best at cutting straight, use a ruler, or fold the shirt to cut it all at once. 

After cutting, I tried it on again. At this point, I realized I also wanted to shorten the sleeves. 
But first! Hem the shirt!! Double fold the fabric over, making sure that everything stays even. Sew that shit up!

If you want to shorten the sleeves, try on the shirt n see how short you want them to be. I folded the sleeve end twice and liked that length. So I cut off the hemmed cuff part and folded my raw edge one cuff width up and sewed. 

This part was okay until I got to the next sleeve. I was nervous the sleeves were gonna be uneven. So, just try you best to keep them even. Maybe even break out the measuring tape to get everything exact. But I wasnt like super worried.

After sewing the last sleeve, I was done! Booyah!

I paired mine with some diy high waisted cutoffs.


Hope you enjoyed this diy!! And I hope you try it out! 
Embrace the crop top and high waisted stuff trend!!! :)

Thanks for reading or just looking.

FOLLOW ME: INSTAGRAM | LOOKBOOK | BLOGLOVIN 
 

Friday, May 9, 2014

Refashioned black amish-like dress!

I finished this project maybe a month or so ago and have been wanting to post it since i started this blog. I only just moved everything over to my new laptop so I finally have the pictures for it! yay! ok so here it is.


This dress was a long plain black linen dress, with a waist tie connected to the back. Sorry for the horrible mirror pics of this, but its all i have now hehe.
It wasnt much when i first bought it, but i liked the straps; very reminiscent of overall straps, and overalls are in now. I actually bought this dress about a year ago and just kept it in my clothing bins at home while i went abroad n stuff, never looking at it again till spring break, when I had the urge to do something with it. I decided to make it into a jumper.

I dont have any pictures of the process, so I'll just have to bore you with my prose.
My first step was trying it on and figuring out where to cut first. I needed to remove the tie in the back, which was connected to the side seams and housed inside a tube made out of the top and bottom of the dress.
My first cuts were one on each side of the top till the point where the tie tube was. I seam ripped (well, cut, since i only had scissors) the top from the bottom and put the top aside for now.
I cut one side of the long bottom part and folded it in half longways so i cud see how long i cud make the skirt. I had enough fabric for a pleated skirt to i cut the rectangle long ways, sewed the two pieces together, and hemmed the thing. Some of it was already hemmed from the existing hem of the dress.
Next, I planned out my pleats. I first started with 2 inch pleats, but it was too small to fit around my hips, so I pulled the pleats out a little to 1.5 inches. That worked, and I pinned my top to the skirt so i could make an elastic tube. I wanted to be able to put in over my hips and then sit above them.
That part took a while since I hand-sewed it all n stuff.
After that, I moved on to the top. Before I sewed it to the skirt, it was two separate pieces only connected by the straps n flimsy buttons. While sewing them to the skirt, I placed the two pieces where I wanted, the front part taking up slightly more space than the back piece. 
When approaching the top, I realized that the top was not hemmed, it had bias tape on the edges. That was a little annoying because at the start I had cut through that bias tape without realizing it. The top pieces were also too wide, so I cut them the width I wanted and seam ripped the bias tape connected to that part up to the strap area. 
I had to go back and sew the bias tape back down in the back and front and still had space. So i seam ripped the dress's previous tie open and used that for the remaining bias tape I needed. Once I did all that, I was almost done. I shorted the two straps and changed the buttons. 
Then I was finally done! Happy day!

Here's the finished product:


Here's the look on lookbook.nu with my jumper!


Hope you enjoyed! Thanks for reading or just looking.

FOLLOW ME: INSTAGRAM | LOOKBOOK | BLOGLOVIN

Monday, May 5, 2014

DIY Pompom trim shorts


This diy is pretty easy, as long as you have some sewing knowledge.

Got my inspiration for this DIY from a pic from my previous inspiration post:


For this DIY, you will need:


- some shorts (I thrifted mine)
- pompom trim of any color you like (Got mine at joanns; they only had a little left so I got the rest, I'd say no less than 1 1/3 yds, depending on your shorts width)
- thread the color of your shorts, or close to it
- pins


Before I did anything, I tried on the shorts. I noticed my shorts were longer than I wanted them to be, so I tried them on inside out and pinned them to my desired length. You don't have to do this if the shorts are already as short as you want them to be.

Because I don't have a sewing machine, I wanted to shorten the amount of sewing I would do. So I pinned the pompom trim to the bottom of my shorts where I wanted and backstitched along the bottom of the trim.
Next, I cut the excess off the folded fabric on the bottom of my shorts. Then, I folded the raw edges under the pompom trim. Then, I sewed the top of that part.
To save going back and sewing over the top of the trim, I did a series of stitches: one along the folded edge of the shorts, then one grabbing the loose edge of the trim and sewing it down to the shorts, like this: 


 You don't have to do it this way. I just did it to save time and energy. And you don't have to do it this way if you didn't change the length of your shorts like I did. You would already have a hem at the bottom, so no worries.

After a lot of handsewing and watching Bioshock playthrough videos from my favorite lets-player, HarshlyCritical, aka John, I was finished!


I had a tiny bit less than I needed to do two whole shorts holes, or whatever you call them haha. I probably only need two more pompoms to finish the right leg, but I think it looks fine without them. The empty space is in between my legs so I doubt anyone will notice. 


And here it is! I hope you all enjoyed the tutorial n try it yourself!! Send me the pics if you do. I'd love to see :)

FOLLOW ME: INSTAGRAM | LOOKBOOK | BLOGLOVIN

Sunday, May 4, 2014

Thrift Haul

Hey, everyone. It's been a while, sorry!

Last Thursday I went to town n got some stuff at the Salvation Army.


High waisted pink shorts (one leg already pinned for a project ill post in the future)


a blue jean vest


printed mens button up


light pink dress


im excited for all of these items. I bought the shorts and button up w diys in mind, which ill post later. got the inspiration from my inspiration post here.

not sure if ill do anything to the vest. its fitted compared to vests ive bought in the past so I thot it was worth it, n I love collared shirts. I don't really like the pockets, so I might get rid of those, but we'll see.

I really love this pink dress. When I bought it, it was super wrinkly, but that went away after washing it. I really love the color and the fit of it. I will probably wear it under my gown at graduation. Also, for this midnight breakfast thing tomorrow night at my college, if you dress up like a superhero u can win door prizes, so I'm planning on dressing up like Blossom from the Powerpuff Girls in this dress. I don't have a wide black belt though, but that's not gonna stop me. Will probly instagram a pic of that outfit. I'm excited hehe :)

Thanks for reading!

FOLLOW ME: INSTAGRAM | LOOKBOOK | BLOGLOVIN

LinkWithin

Related Posts Plugin for WordPress, Blogger...